

Earth Day Seed Pods
Apr 01, 2021
Supplies
• Blue and green construction paper, 4 sheets of each (or scraps left over from other projects)
• Muffin tin
• 1 packet of wildflower seeds, choose flowers native to your area
• Blender
• Colander, plus coffee filters, cheesecloth or a cotton kitchen towel to line the colander
Directions
If you’ve ever made homemade paper, this is the same process, except you are creating disks of paper embedded with seeds instead of a flat piece of paper to write on.
1. Tear the construction paper into small pieces, about an inch or less in size. Place one color of the torn pieces into a blender. Next, pour four cups of water into the blender. Blend the paper and water until it is a pulpy mixture. You will know the pulp is finished when you can’t see visible pieces of paper. Pour off the extra water from the blender and then dump the pulp into a bowl.
2. Rinse out your blender, and then make paper pulp with the green construction paper in the same way as you made the blue batch. Dump the green pulp into a separate bowl from the blue. Sprinkle a pinch of seeds on top of each color of pulp, then mix seeds in with your fingers.
3. Next, drain excess water from the blue pulp with a colander. Line the colander with dampened coffee filters, a cloth dish towel or large piece of cheesecloth. Add pulp to the lined colander and allow to drain over a bowl or the sink. You can press down on the pulp with your hand to hurry the process. Repeat with the green pulp.
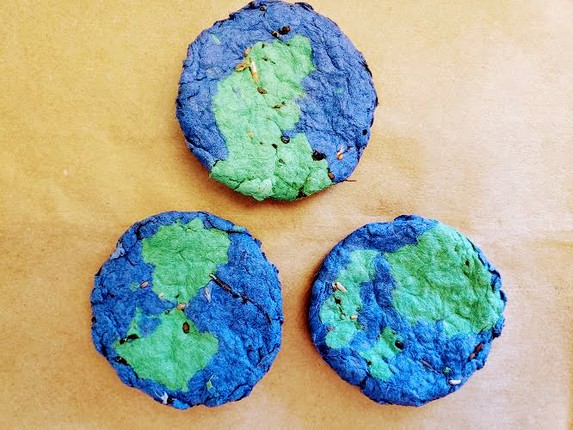
4. Once both pulp colors have drained, make your earth shape by filling one cup in the muffin tin with blue pulp, about ⅓ full. Next, make two holes with your finger tip inside the blue circle of pulp.
5. Add a bit of green pulp to each hole. Don’t worry that the green doesn’t look like the continents yet, it will flatten out and spread in the next steps.
6. Press down the entire earth shape with fingers to compress. Repeat with other cups in the tin.
7. Remove extra water from your seed pods by pressing down on each earth shape with a dry paper or cloth towel to soak up extra water. Do this a few times for each cup in the tin.
8. Once they look fairly dry and compact, check for excess water by pressing gently on one seed bomb with your fingers. If you see water well up, use the towel again. The more water you remove, the shorter the drying time will be. Once you’ve soaked up as much water as possible, you may need to flatten out the earth shapes again with your fingers. Set aside the filled muffin tin to dry. The drying process can take 24-48 hours depending on your climate.
9. When the seed pods are dry, remove each from the muffin tin. Once you remove the pods from the tin, you may need to allow the bottom surface to dry out by putting them on a plate bottom side up. If your seed pods aren’t totally dry, the disks will crumble and fall apart.
10. You can plant the seed bombs two ways. These can be placed outside on bare soil in a sunny spot and the next time it rains, the paper will decompose and the seeds will germinate. You could also plant these in a flower pot filled with potting soil. Put the seed pod on top of the soil in your pot, water and place in a sunny location. Either way, kids will enjoy spreading spring flowers!